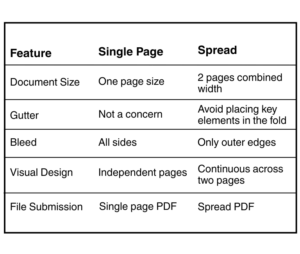
Home > How to Set Up Artwork for Spreads & Single Pages

Setting Up Artwork for Spreads & Single Pages

Creating artwork for print requires an understanding of the difference between single-page layouts and spreads. A correct setup ensures that your final product prints accurately, avoiding issues like misaligned content or unintended cropping.

Single pages

Single pages

A single page refers to an individual page within your document or publication. Artwork for a single page is created one page at a time, with each page treated as a separate layout. This setup is typically used for materials such as business cards, flyers, or other standalone print pieces where each page functions independently.

Spreads

Spreads

A spread refers to two facing pages that appear together, such as the left and right pages of a book or magazine. Artwork for a spread is designed as a single, continuous layout that spans both pages, creating a cohesive visual across the centre fold. Spreads are commonly used for images, graphics, or designs that need to extend across two pages, giving a more immersive and dynamic presentation than individual pages.

We prefer single pages for the most part. We only really require spreads for covers when we are printing perfect bound books.

Artwork for Single Pages

Artwork for Single Pages

  1. Document Size: Set the page dimensions to the final trim size of the printed piece.
  2. Bleed: Add 3mm bleed around all sides if your artwork has elements that go to the edge.
  3. Margins/Safe Area: Keep important text or images at least 3mm away from the trim edge to avoid cutting issues. So on an A4 document (210mm x x297mm) the important content, would stay within 204mm x 291mm.
  4. Resolution: Ensure images are 300 DPI for high-quality printing.
  5. File Format: Save as PDF, with embedded fonts.
Artwork for Spreads

Artwork for Spreads

  1. Document Size: Set width = left page + right page width, height = page height. For example, an A4 booklet (210mm x 297mm) book spread would be 420mm x 297mm in your layout.
  2. Bleed: Add 3mm bleed around all outer edges, not the inner gutter (the middle where pages meet). We recommend an additional 5mm either side used for glueing .
  3. Gutter/Safe Area: Keep critical elements away from the centre fold. The middle fold may slightly obscure small details and copy.
  4. Resolution: Ensure images are 300 DPI for high-quality printing.
  5. File Format: Save as PDF, with embedded fonts
Key Differences

Key Differences

This graphic shows the key differences between setting up artwork for spreads and single pages. Follow these guidelines for fault free artwork.

Tips for Both Layouts

  • Ensure that all proofs are checked thoroughly before approving for print.
  • Keep consistent fonts, colours, and styles across pages/spreads.
  • Avoid placing text too close to edges or folds.

Need help? Contact us by email or call our team on 01423 881158